Spring Boot如何整合Redis
工具/材料
IntelliJ IDEA
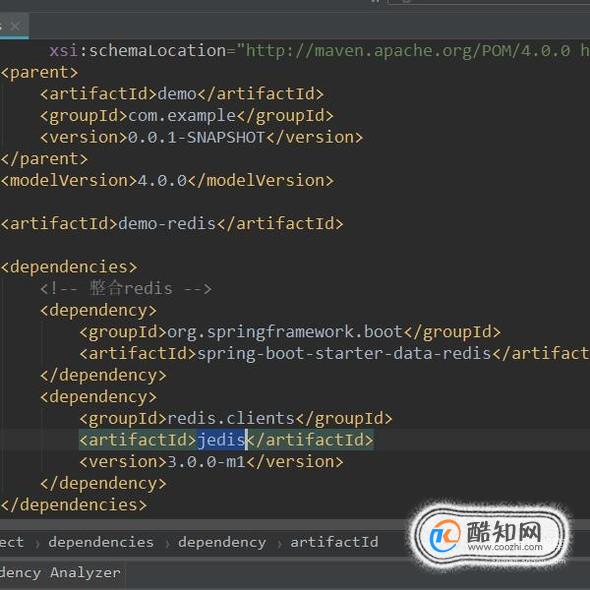
操作方法 01Spring Boot整合Redis我们需要添加依赖的jar包,spring-boot-starter-data-redis中包含spring和redis相关的jar包,jedis作为redis的客户端也需要添加到工程中,Spring Boot的版本信息在父pom中已指定,子模块中的spring相关的jar包无需另外指定。
<dependency>
<groupId>org.springframework.boot</groupId>
<artifactId>spring-boot-starter-data-redis</artifactId>
</dependency>
<dependency>
<groupId>redis.clients</groupId>
<artifactId>jedis</artifactId>
<version>3.0.0-m1</version>
</dependency>
 02
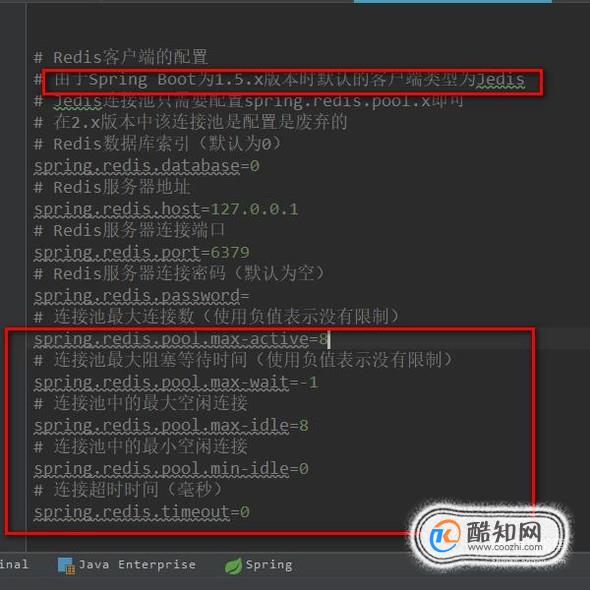
02 Spring Boot会根据application.properties中的配置对Redis的属性进行自动配置,并注入到RedisProperties类中。在application.properties配置文件中这些属性都是以spring.redis为前缀的,值得注意的是在Spring Boot 1.5.x版本中默认的Redis客户端是jedis,因此在配置文件中无需指定,如下图所示。
 03
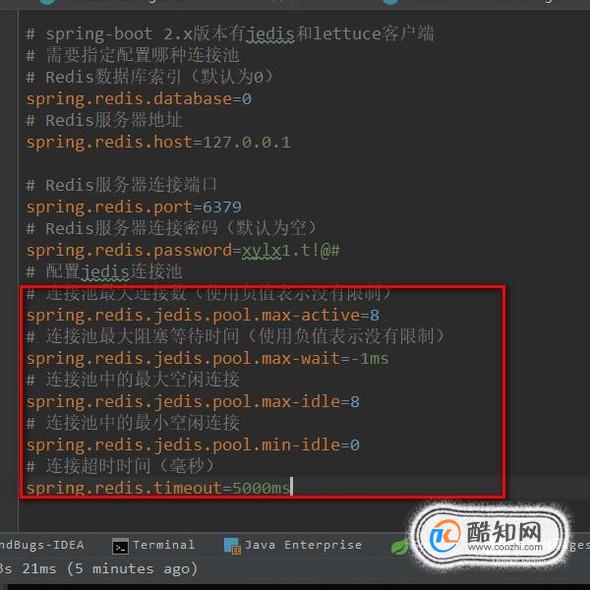
03 Spring Boot 1.5.x版本的整合配置网上可以搜索大量的文章,然而Spring Boot 2.x版本的整合资料却非常少,甚至提供的配置不能正常使用,因此本文主要讲解Spring Boot 2.x整合Redis以及Redis的使用情况。spring-boot 2.x版本有jedis和lettuce两种客户端,因此我们必须要去指定使用哪一种客户端,两个客户端的配置如下图所示,本文使用的是Jedis客户端连接池,具体的配置如下。
# Redis数据库索引(默认为0)
spring.redis.database=0
# Redis服务器地址
spring.redis.host=127.0.0.1
# Redis服务器连接端口
spring.redis.port=6379
# Redis服务器连接密码(默认为空)
spring.redis.password=xylx1.t!@#
# 配置jedis连接池
# 连接池最大连接数(使用负值表示没有限制)
spring.redis.jedis.pool.max-active=8
# 连接池最大阻塞等待时间(使用负值表示没有限制)
spring.redis.jedis.pool.max-wait=-1ms
# 连接池中的最大空闲连接
spring.redis.jedis.pool.max-idle=8
# 连接池中的最小空闲连接
spring.redis.jedis.pool.min-idle=0
# 连接超时时间(毫秒)
spring.redis.timeout=5000ms
由配置我们可以看到spring-boot 2.x版本时间设置需要加单位ms,因为参数的类型为Duration。另外spring.redis.timeout尽量不要配置0,否则可能会出现io.lettuce.core.RedisCommandTimeoutException: Command timed out超时错误。
 04
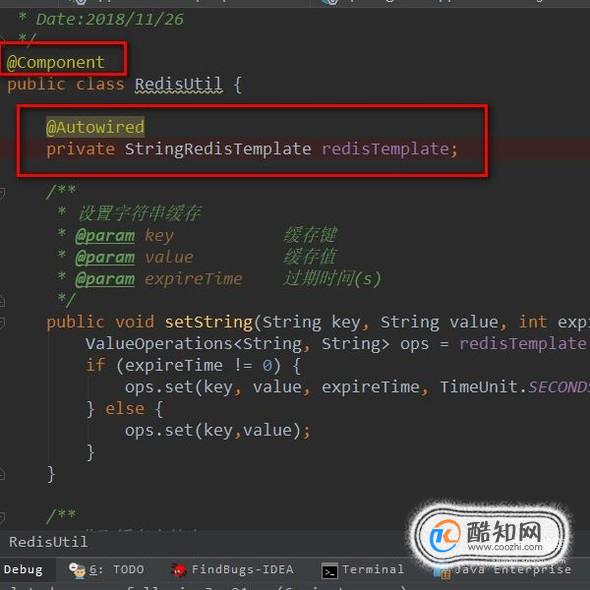
04 配置文件编辑完成后,我们开始编写代码实现Redis数据的存储和读取。我们创建一个RedisUtil工具类,该类使用@Component注解表示交由Spring管理,StringRedisTemplate是Spring提供的,可以使用@Autowired注解直接注入,接下来便可以书写存和取的代码了。
@Component
public class RedisUtil {
@Autowired
private StringRedisTemplate redisTemplate;
/**
* 存字符串
* @param key 缓存键
* @param value 缓存值
* @param expireTime 过期时间(s)
*/
public void setString(String key, String value, int expireTime){
ValueOperations<String, String> ops = redisTemplate.opsForValue();
if (expireTime != 0) {
ops.set(key, value, expireTime, TimeUnit.SECONDS);
} else {
ops.set(key,value);
}
}
/**
* 取字符串
* @param key 缓存键
* @return 缓存值
*/
public String getString(String key){
ValueOperations<String, String> ops = this.redisTemplate.opsForValue();
return ops.get(key);
}
 05
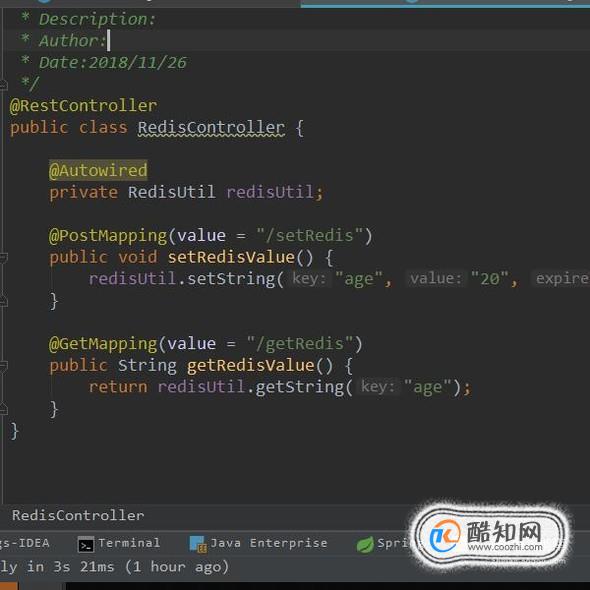
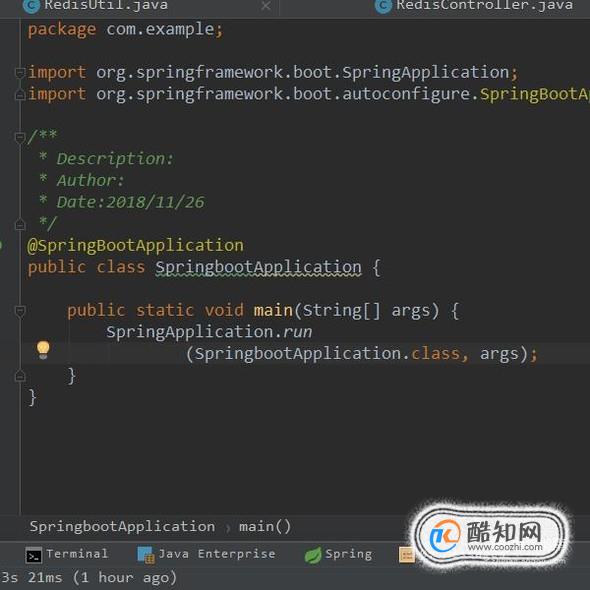
05 接下来我们编写Controller层代码去调用RedisUtil工具类,实现数据的存储和读取,代码比较简单可以参考下图。若想验证Redis是否可用,还需要编写启动类,如下图所示。
 06
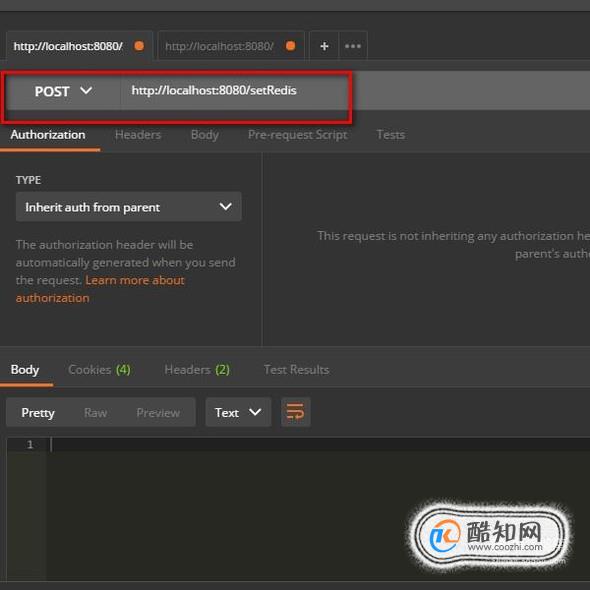
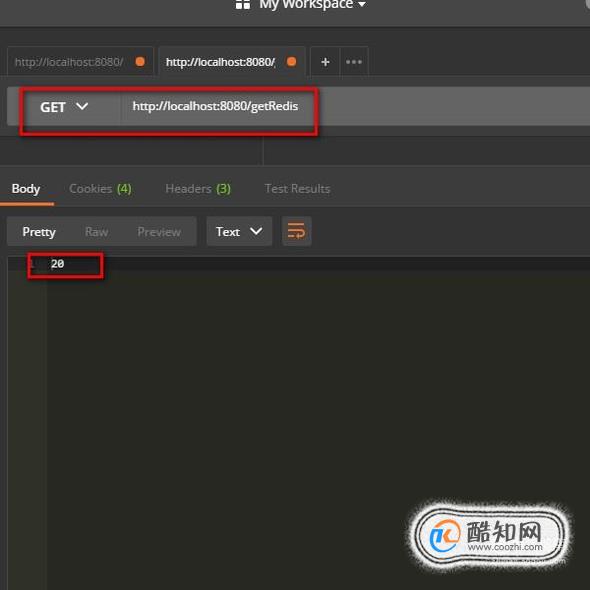
06 由上图可看到我们编写了一个post请求用于存储字符串,get请求用于取出字符串。启动类通过main方法启动应用,接下来我们使用postman去模拟浏览器调用post和get请求,由下图可以看到Redis存储的数据成功被取出。
 07
07 接下来我们介绍Jedis,这是一个封装了Redis的客户端,在Spring Boot整合Redis的基础上,可以提供更简单的API操作。因此我们需要配置JedisPool的Bean,代码如下,其中@Configuration注解表明这是一个配置类,我们在该类中注入RedisProperties,并且使用@Bean注解指定JedisPool。
@Configuration
public class RedisConfiguration {
@Autowired
private RedisProperties properties;
@Bean
public JedisPool getJedisPool(){
JedisPoolConfig config = new JedisPoolConfig();
config.setMaxIdle(properties.getJedis().getPool().getMaxIdle());
config.setMaxTotal(properties.getJedis().getPool().getMaxActive());
config.setMaxWaitMillis(properties.getJedis().getPool().getMaxWait().toMillis());
JedisPool pool = new JedisPool(config,properties.getHost(),
properties.getPort(),100,
properties.getPassword(), properties.getDatabase());
return pool;
}
}
 08
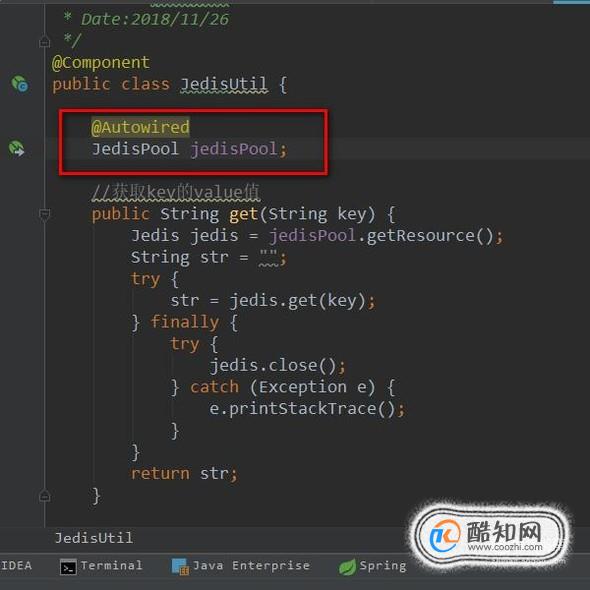
08 接下来我们编辑JedisUtil工具类,通过SpringBoot容器的@Component注解来自动创建,并且注入JedisPool,使用jedisPool.getResource()方法来获取Jedis,并最终实现操作redis数据库,其代码如下。
@Component
public class JedisUtil {
@Autowired
JedisPool jedisPool;
//获取key的value值
public String get(String key) {
Jedis jedis = jedisPool.getResource();
String str = "";
try {
str = jedis.get(key);
} finally {
try {
jedis.close();
} catch (Exception e) {
e.printStackTrace();
}
}
return str;
}
public String set(String key, String value) {
Jedis jedis = jedisPool.getResource();
String str = "";
try {
str = jedis.set(key, value);
} finally {
try {
jedis.close();
} catch (Exception e) {
e.printStackTrace();
}
}
return str;
}
}
 09
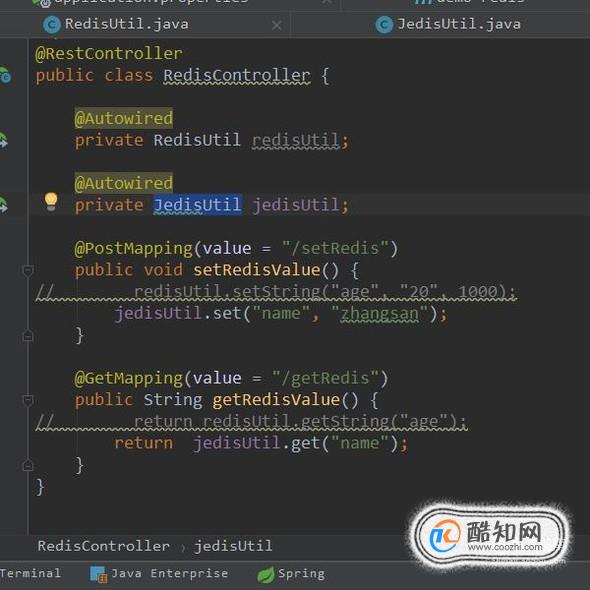
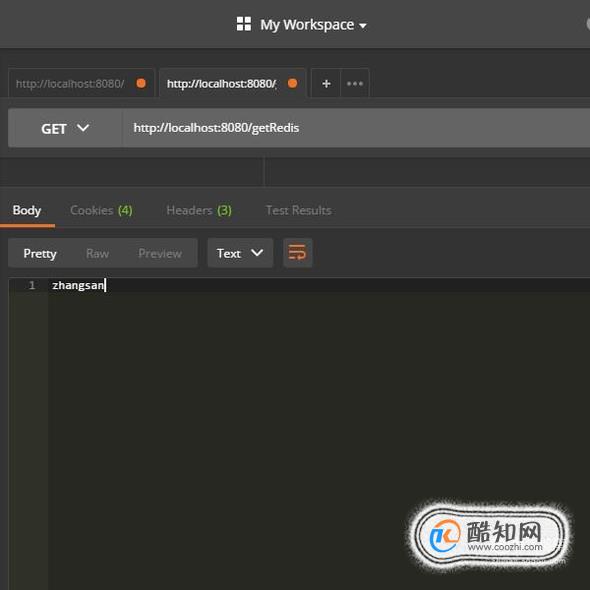
09 JedisUtil工具类编写完成后,我们修改之前的RedisController,并注入JedisUtil,代码如下图所示。然后再用postman分别调用post和get接口,我们可以看到成功取到了新的key的value值。
 特别提示
特别提示 在Spring Boot整合Redis前本机需安装Redis,另外可以使用RedisDesktopManager这个Redis这个桌面管理工具查看Redis中的数据。
以上内容就是来自于小编为大家分享的关于Spring Boot如何整合Redis方面的知识,同时也希望小编所为大家分享的知识能够为大家起到帮助,那么如果大家还想要了解更多关于其他方面的知识,也欢迎小编对站长进行留言,我们将会听取用户们的建议,让本站越做越好。
免责声明:本文由用户上传,与本网站立场无关。财经信息仅供读者参考,并不构成投资建议。投资者据此操作,风险自担。 如有侵权请联系删除!
-
截至2023年,大众高尔夫GTI的最新款车型为2024款。关于2025款高尔夫GTI的价格和配置信息,目前尚未有官方发布...浏览全文>>
-
在当今社会,汽车已经成为人们日常生活中不可或缺的一部分。对于许多家庭来说,选择一辆适合自己的车不仅关乎...浏览全文>>
-
随着汽车市场的不断变化与发展,2025款大众CC以其优雅的设计和卓越的性能吸引了众多消费者的关注。作为一款备...浏览全文>>
-
安徽阜阳探影新车报价2023款大公开:买车不花冤枉钱随着汽车市场的不断发展,消费者对于购车的性价比和实用性...浏览全文>>
-
在安徽滁州地区,上汽大众途观L是一款备受关注的中型SUV。途观L凭借其宽敞的空间、强劲的动力以及丰富的配置,...浏览全文>>
-
关于2025款大众ID 系列车型在安徽淮南的售价及落地价问题,我们可以从以下几个方面进行详细分析。大众ID 系...浏览全文>>
-
安徽阜阳帕萨特多少钱?选车秘籍与落地价全攻略在安徽阜阳,选择一款适合自己的帕萨特车型需要综合考虑预算、...浏览全文>>
-
在当今的汽车市场中,新能源汽车因其环保性和经济性逐渐成为消费者关注的焦点。对于生活在安徽阜阳地区的朋友...浏览全文>>
-
随着新能源汽车市场的快速发展,消费者对于新能源车型的关注度持续攀升。作为一款备受瞩目的高端新能源车型,...浏览全文>>
-
在2024款的汽车市场中,一汽-大众ID 6 CROZZ以其豪华配置和出色的性能吸引了众多消费者的关注。作为一款纯电...浏览全文>>
- 安徽阜阳探影新车报价2023款大公开,买车不花冤枉钱
- 安徽阜阳帕萨特多少钱?选车秘籍与落地价全攻略
- 安徽阜阳途锐新能源多少钱?选车秘籍与性价比大公开
- 奇骏试驾需要注意什么
- 长安欧尚520试驾操作指南
- 试驾哈弗H6操作指南
- 安徽阜阳探影落地价实惠,配置丰富,不容错过
- 丰田雷凌预约试驾操作指南
- 滁州ID.4 X多少钱 2025款落地价,换代前的购车良机,不容错过
- QQ多米最新价格2025款,各配置车型售价全揭晓,性价比之王
- 阜阳ID.4 CROZZ新款价格2025款多少钱?选车指南与落地价全解析
- 阜阳ID.7 VIZZION多少钱?选车秘籍全攻略
- 滁州大众Polo最新价格2024款,各配置车型售价一目了然
- 天津滨海大众Polo落地价,各配置车型售价一目了然
- 亳州途观X多少钱?选车秘籍全攻略
- 奥迪e-tron GT试驾,如何享受4S店的专业服务?
- 安庆探影落地价全解,买车必看的省钱秘籍
- 岚图梦想家 2025新款价格大揭秘,各配置车型售价一览表
- 山东济南长安启源E07多少钱 2024款落地价,最低售价19.99万起,入手正当时
- 天津滨海T-ROC探歌新车报价2025款,购车前必看的费用明细